

YELLOW, New phone who dis?! Could this vintage rotary phone costume be any cuter?! I am sooo obsessed with how it turned out! Read more to find out how I was able to make it almost entirely out of cardboard!

I say it almost every time, but I think this costume might be my new favorite I have ever made! I have such an affinity for the costumes I create out of cardboard! (Definitely thought about starting a series called: Out of the Box, where I just share fun things you can make out of cardboard! No one steal that idea from me!!) I am so proud of how this costume turned out! It almost identically matches the idea I had in my head, which can be rare when DIYing a costume! Especially one so large… but I couldn’t be happier with the result!
It’s so funny the random things that bring about inspiration! I get costume inspiration from so many mundane things around me! Sometimes those random things really get your creative juices flowing, and that is definitely true for this costume! Last year, I was playing with a slinky with my eldest daughter, and I thought, “this reminds me of a phone cord on one of those old phones“. And then I quickly thought “I should make that into a costume!” That folks is how my brain works! haha So I jotted my idea in my perpetual “Halloween Costume Idea” notes in my phone and had the inspiration there already for this costume for this year!


This costume is one of those “I really want to try to make that” costume, rather than one that I would feel comfortable wearing to a party or out trick-or-treating or anything! It is BULKY! Definitely a tough time squeezing through doorways or having any real movement of your arms! I originally didn’t even have arm holes cut out!! But once I was trying it on for a “final look” I was like why the heck didn’t a make arm holes?! But even if I wasn’t intending to wear this costume for a whole night, I really LOVE a creative challenge! Plus, the whole costume was made entirely of used cardboard, so no unnecessary waste!


This is one of those costumes that is hard to create a step-by-step tutorial because I was kind of just winging it the entire time… So I don’t have specific steps to share! BUT I figured I would share my process and what steps I took to complete this costume and maybe it will help inspire you to try it for yourself!
DIY ROTARY PHONE COSTUME
SUPPLIES:
– Cardboard (lots and lots of cardboard)
– Silver Poster Board
– White Poster Board x2
– Baseball Hat
– Slinky
– Hot Glue Gun
– Duct Tape
– Small Foam Wreaths x 2
– Newspaper
– Glue
– X-acto Knife/Box Cutter
– Number Stickers
– Permanent Marker
– Paint
How To:
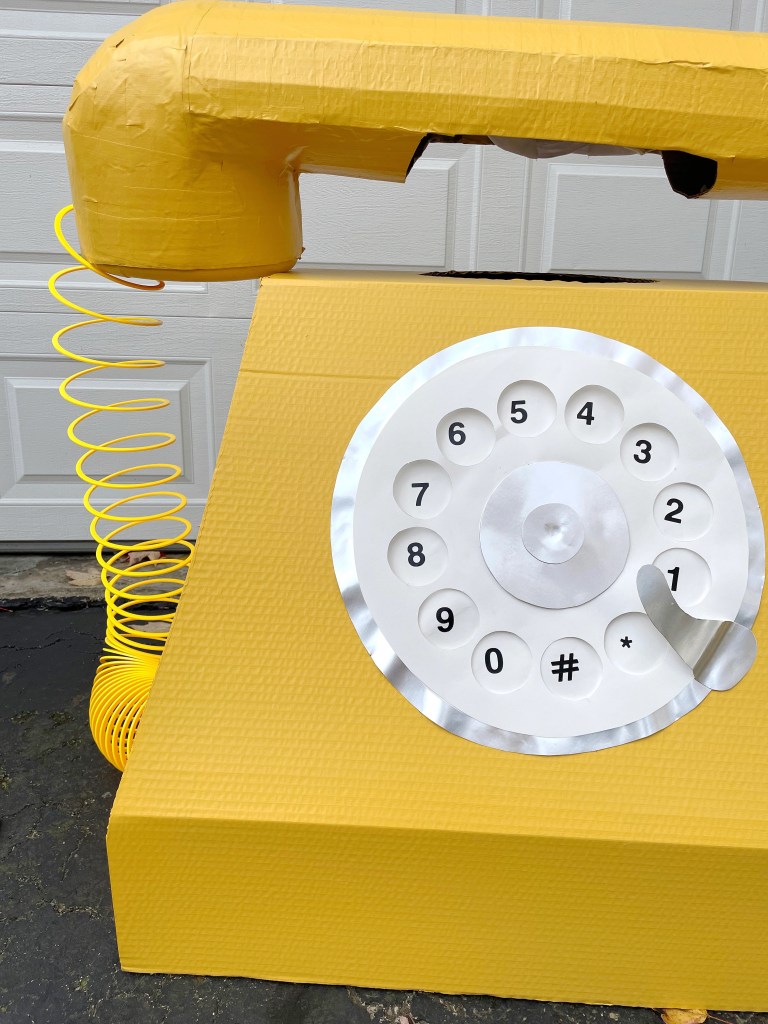
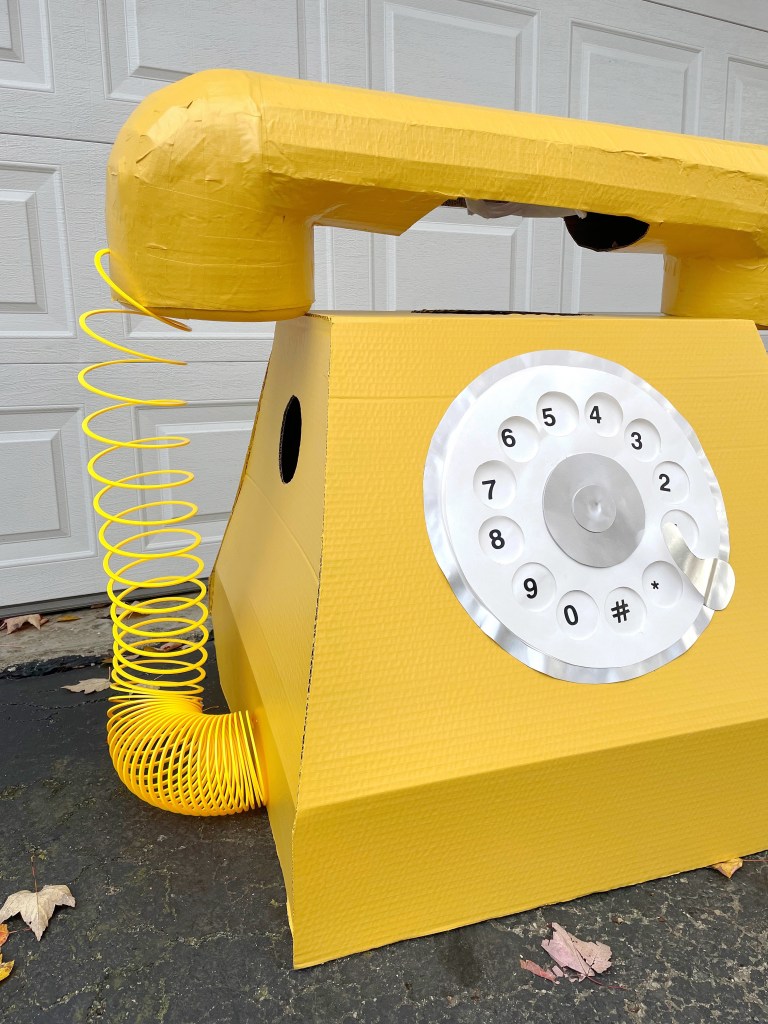
1.) First I started off with the base of the telephone! I cut 5 pieces to create the front, back, top and sides of the phone! I knew I wanted to have mine have a few extra angles to it, so I bent/folded the cardboard as I went to get a feel for the exact shape I was going for! I cut the front and the back first since those are most important for the overall look and shape of the phone, and then cut the sides and top in order to fit and support the front and back. In the top piece I also cut a hole for my head to fit through. (I previously mentioned I didn’t cut arm holes until the very end, but you can totally go ahead and make that cut now too) Once I had all my cuts completed, I glued together all the sides with my hot glue gun, and then further supported the inside of the base with duct tape along the seams. This created the base and majority of the costume.
2.) Next I made the actual phone headpiece, and this may be where I lose you! I made this through a bunch of trial and error of making LOTS of cardboard cuts and gluing it together in my desired shape! But I will try to best describe my method for you!
– First I had to make the head piece “wearable”, so what I did was attach a baseball hat onto the bottom of a long straight piece of cardboard (the top of my phone handset). To do this, I cut off the bill of the hat, and the little button fasciner on the top, then I hot glued the hat to the piece of cardboard. I further supported it by adding some duct tape around the hat.
– After attaching the hat, I made the phone top a bit more rounded. To do this I just glued/taped some extra pieces or cardboard to the existing piece and created almost a tube shape.
– Next I worked on the speaker/mouthpiece part. To get my desired shape, I glued a small round Styrofoam wreath onto a piece of round cardboard (same circumference), and then build it up into a short cylinder by wrapping a piece of cardboard around the wreath.
– Now that I had the general shape of the handle/top of the phone and the general shape of the ear and mouth pieces, it was time to connect them together. This is where it was a bit of trial and error and a game of Tetris with the cardboard. I knew that I wanted the pieces to come together in a rounded shape (like a real phone handset) so I rolled different cuts of cardboard and glued/taped them together to get my desired shape.
3.) After my headpiece was basically assembled, I decided that I would papier-mâché over it so that the lines were a bit more smooth! To papier-mâché all you need to do is combine some liquid glue (Elmers is perfect) with water (a 1:1 ratio) and cut some newspaper into strips. Dip your newspaper strips into the the glue mixture (remove access glue) and smooth on top of the cardboard. Repeat this process until the entirety of the handset is covered. Allow time to dry.
4.) Now that you have your phone base and phone handset (head piece) completed, it’s time to add a little color!! Paint the entirety of the costume in any color you’d like! I thought yellow would be such a fun, happy color, so that’s what I chose! But this is entirely up to you! I think a pink phone would look so cute too! Allow time to dry.
5.) While your paint is drying, it’s time to make the rotary dial! This is super simple! Just consists of cutting two white poster board in identical circles, and cutting a piece of silver poster board in a slightly larger circle so that the white can be offset from the silver when it sits on top. Once you have all of these large circle shapes, glue one white poster board on the silver. With the other white poster board you are going to cut out 12 small circle along the inside, I did this with an x-acto blade. Once cut, affix this white poster board on top of your other white poster board and where the holes are located, add your number stickers. Once that is all together you can finish the dial off with some more details! I added a small silver stopper and matching silver center circle.
6.) Once your base is dry, you can glue on your rotary dial right in the center.
7.) Lastly you will need to attach your slinky from the handset to the base of the phone. To do this, I cut a small hole into each and just threaded each end of the slinky through both pieces, connecting them together!

The rotary dial actually spins too! I did this by bending a paperclip in between the two white poster board layers! This allows for them to be attached but not stationary.

I am just so in love with how this costume turned out! I think it is so fun and adds just the right amount of whimsy and nostalgia! In the 15 mins that we were outside taking pictures of this costume in front of my garage, there were no less than 10 cars that yelled “I love your costume!” as they passed by! If strangers just passing by love it, can you even imagine the attention you would get at a party?!


If I have inspired you to make your very own, please let me know! I would love to see what you come up with!!
Happy Halloween!

Created and Photographed by Auburn Artisan

This took me back to my childhood. Back when the Halloween Parade Costume winners were the ones that showed up in handmade costumes like a slice of Supreme Pizza or a Campbell’s soup can.
LikeLiked by 1 person
Aww that is so sweet Patricia!!! That sounds like a pretty magical childhood!! ❤
LikeLike